In this article:
- Overview
- Before You Begin
- Benefits of Deploying to Azure Using Cloud Application Manager
- Registering Your Azure Subscription in Cloud Application Manager
- Deploying in Azure
- Contacting Cloud Application Manager Support
Overview
There are two different flavors of Azure and Cloud Application Manager has providers for both. This document is in reference to Classic Azure.
Please note that Microsoft no longer recommends the usage of the Classic Azure deployment model, which has been superseded by the Resource Manager model. For more information see this Microsoft article.
| Name | URL of Portal | Name of Provider | KB article |
|---|---|---|---|
| Classic Azure | https://manage.windowsazure.com | Classic Azure | This document |
| Microsoft Azure | https://portal.azure.com | Microsoft Azure | Using Microsoft Azure |
Microsoft's Classic Azure hosts applications in virtual machines and in cloud services via Web, Worker roles. Cloud Application Manager supports deploying to all three models through the Virtual Machine Role, Web and Worker roles. Take a look at the benefits of deploying to Azure using Cloud Application Manager.
Note: If you’re running Cloud Application Manager as an appliance in your private datacenter, you can deploy only to the virtual machine role.
To learn about Azure hosting services, see the Azure help.
Before You Begin
This Classic Azure provider support is offered through Cloud Application Manager for managing existing Classic Azure subscriptions, and should not be used for new environments, that should be using Microsoft's recommended Azure Resource Manager deployment model with its corresponding Microsoft Azure provider type.
Benefits of Deploying to Azure Using Cloud Application Manager
Cloud Application Manager simplifies Azure deployments with these benefits:
-
Automate VM deployments: We automatically provision services that otherwise you’d have to individually configure and spawn in Azure. For example, we work with the Azure APIs to create a storage account, create availability sets, enable auto scaling, load balancing, and enable endpoints for your virtual machine deployments.
-
Deploy easily to web and worker roles: Typically to deploy in Azure, you have to install and set up the latest Visual Studio development environment, then install Azure SDK tools and extensions including the emulator. After that you must either directly upload your application files through Azure Blob storage or manually create a package (cspkg). But by deploying a web or worker role through Cloud Application Manager, you can skip this fairly involved process.
See how easy it is to get a web or worker role started in Cloud Application Manager: Build a box, upload your application code and configuration files, select Azure deployment options, and deploy. We automatically create a cloud service and storage account for your web or worker role deployments.
-
Switch between VM, web, and worker roles: It’s easy to migrate from virtual machine to web or worker role deployments or vice versa because your configuration is encapsulated in boxes. Simply kill the VM machines and deploy your box into web or worker roles or the other way around.
-
Focus on applications: Once your machines are deployed in Azure through Cloud Application Manager, you can focus on your application and easily handle the entire lifecycle of application instances. We do all the backend API operations to manage your instances. For example, when you delete an instance that you no longer need, we automatically delete the availability set, virtual machine instances, storage account and cloud service, associated with the instance.
Registering Your Azure Subscription in Cloud Application Manager
To connect to Azure in Cloud Application Manager, you need to upload the elasticbox.cer to your Azure subscription and then provide Cloud Application Manager your subscription ID. Follow these steps:
-
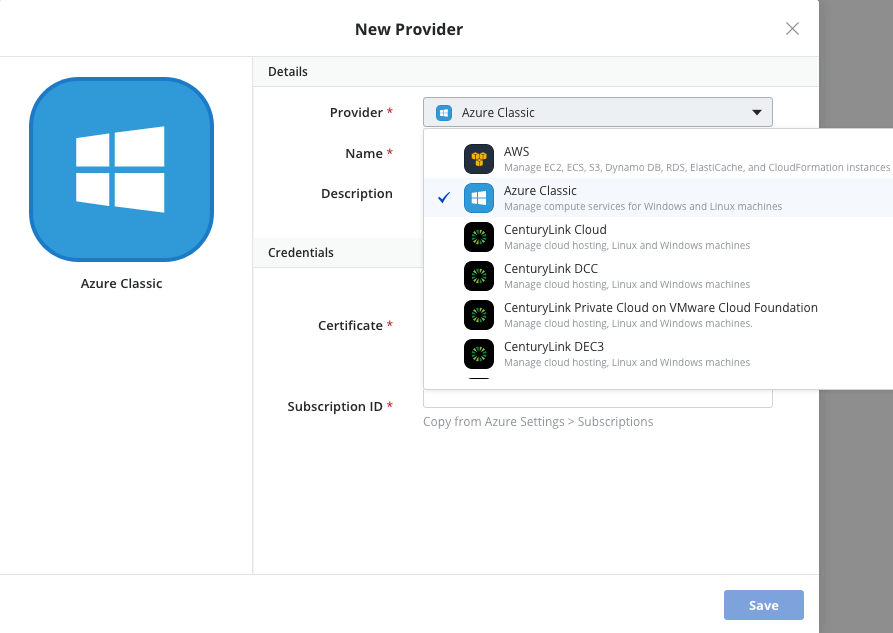
Click Providers > New Provider.
-
In the dialog, select Azure Classic.
-
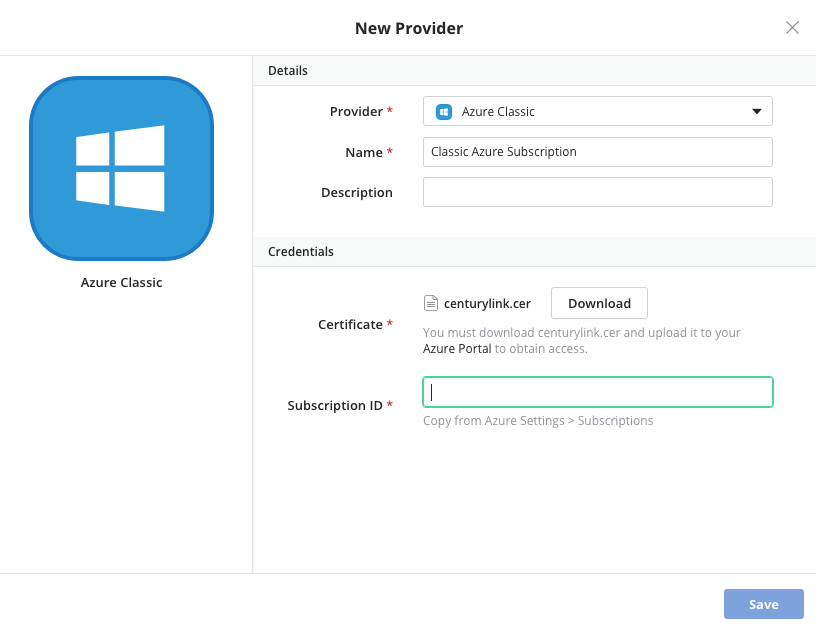
Enter your Azure subscription parameters as shown.
- Enter a useful name to identify the Azure subscription in Cloud Application Manager.
- Under Credentials, click Download. The elasticbox.cer certificate is saved to your local machine. Upload the certificate to your Azure portal.
-
This allows Cloud Application Manager to manage your subscription based on resources you deploy.
-
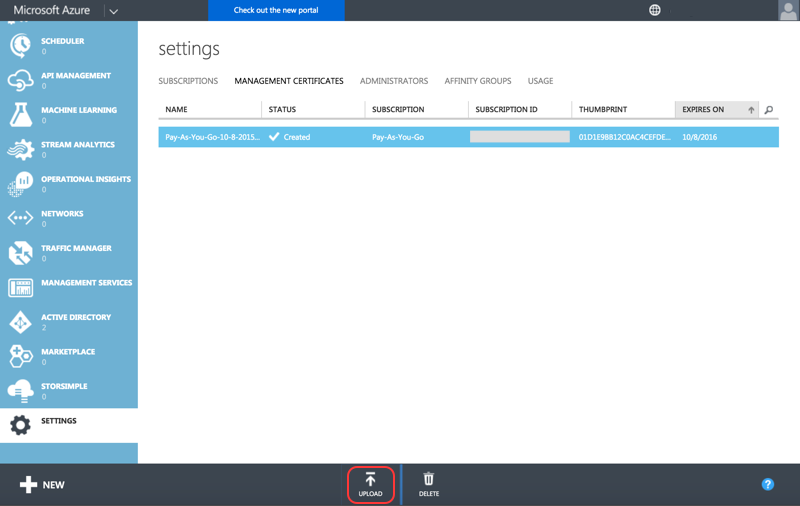
Sign in to the Azure Portal.
Click Settings > Management Certificates > UPLOAD A MANAGEMENT CERTIFICATE.
-
Under FILE > click BROWSE FOR FILE to select the certificate from your local machine.
-
Under Subscription, be sure to select your subscription.

-
-
Click the checkmark to save.
- Copy your Azure subscription ID located under Settings in the Azure Management Portal.
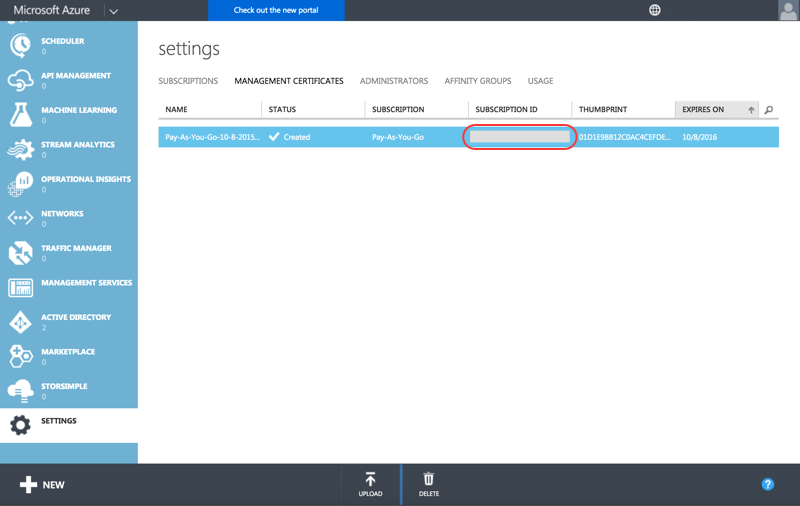
- In Cloud Application Manager, under Credentials, paste in the subscription ID.
- Copy your Azure subscription ID located under Settings in the Azure Management Portal.
-
Click Save.
Deploying in Azure
You can deploy to the following services in Azure:
- Web and Worker Roles
- Virtual machine role
Although all the services are available to Windows based applications, Azure supports only the VM role for Linux applications.
When you’re all set to launch a new instance in Azure, Cloud Application Manager presents deployment profile options for the roles or for the database service.
Web and Worker Roles
Web and worker roles act as the front-end and backend environments to host your multi-tier applications like a web application running on IIS and .NET framework. Although you can run instances in each role independent of the other, you may want to combine them to host complex multi-tier applications.
A web role lets you deploy a Windows web server farm running IIS while a worker role Lets you deploy to a Windows server for processing backend code or running middleware or runtime environments like the .NET framework.
When you deploy a Windows box to a web or worker role, we automatically create a cloud service for your selected affinity group and region and generate the cspkg, csdef, and cscfg files to make boxes and scripts in them run in Azure cloud services.
To deploy in Azure, first upload your application code as file or URL variables in a Windows box. There, add any port variables to open endpoints. And add event scripts as needed to configure the application on the virtual machine. Then launch an instance of the box and choose from the following deployment options.
Note: At this time, we only support deploying to the Production environment in Azure.
In case of multi-tier applications deployed to different roles, follow these tips to allow traffic to the instances and to let them communicate with each other:
-
To allow traffic to web role instances, we automatically open HTTP port 80 for both public (input) and private (internal) endpoints. We also open any other ports that you define on the box.
-
To allow traffic to worker role instances, you have to first define port variables on the box, which we open for both public (input) and private (internal) endpoints.
-
To allow web and worker role instances to communicate with each other, make sure they’re deployed to the same availability set. Configure bindings to connect their boxes. Then print ':' in a configure event script to connect by querying the instance IP address and port.
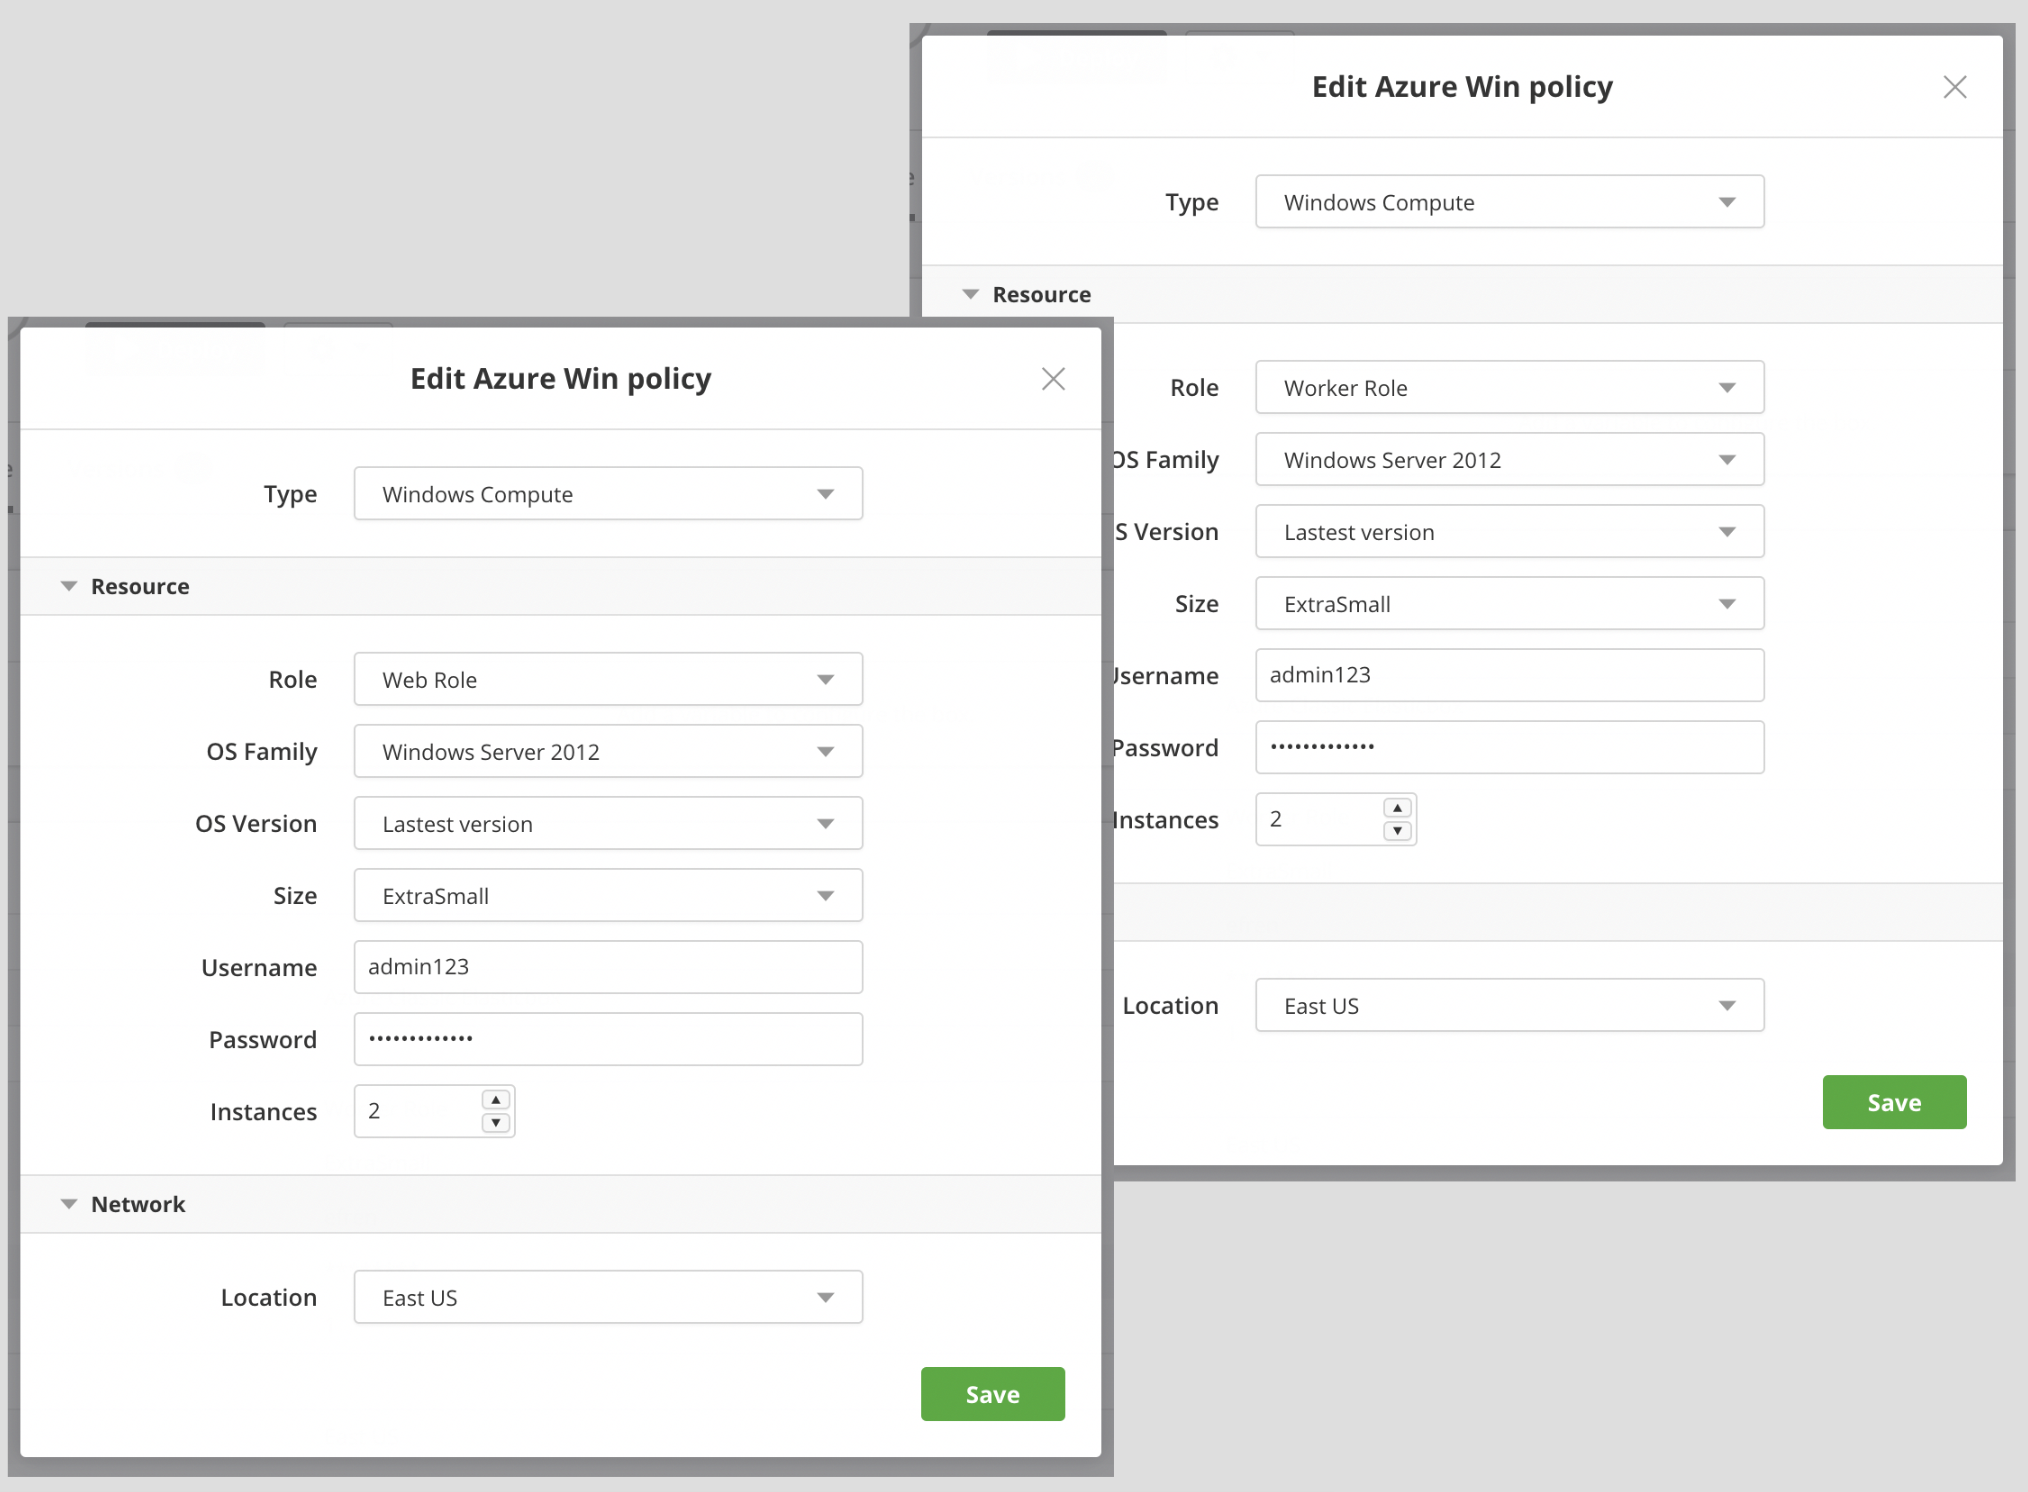
Azure Web and Worker Role Deployment Options
Deployment
| Option | Description |
|---|---|
| Provider | Select the Azure provider you want to use to deploy. |
Resource
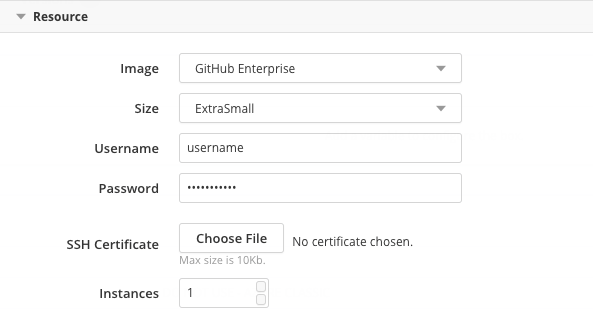
| Option | Description |
|---|---|
| Role | Select Web Role or Worker Role. See Virtual Machine Role to deploy to that instead. |
| OS Family | Select the guest OS to run in the worker role instance. Note that Windows 2008 images are not synced at this time because the Cloud Application Manager agent doesn’t work on them. |
| OS Version | Select the guest OS version to run in the worker role instance. You can select a specific version or go with latest. If you choose latest, the OS is automatically upgraded to the latest version. |
| Size | Select a size to set the number of CPU cores, memory, and disk size to store your OS files, process temporary memory, and store application data. For more information, see the Azure help. Note that D-Series sizes use solid-state drive disks. |
| Username | Specify a username to be able to RDP into the instance directly. |
| Password | Specify a password to be able to RDP into the instance directly. |
| Instances | Specify the number of web or worker role instances to spawn. Note that at this time, we don’t autoscale or load balance web or worker role instances. To enable that, you have to manually configure these options in Azure. |
Network

| Option | Description |
|---|---|
| Location | Select a virtual network, region, or affinity group to physically place the instance. |
Proxy

| Option | Description |
|---|---|
| Host | The hostname or domain of the proxy that the agent will use to connect back to Cloud Application Manager, once it has been installed in the deployed instance. |
| Port | The port of the proxy that the agent will use to connect back to Cloud Application Manager, once it has been installed in the deployed instance. |
Autoscaling Web or Worker Role Instances
To support cloud bursting scenarios, you can proactively plan for scaling your applications deploying to Web or Worker roles in Azure.
Cloud Application Manager supports autoscaling by monitoring CPU thresholds. If CPU usage hits 80%, a new instance is added in that role. Similarly if CPU usage is at 60% or below, the role instances are scaled down.
To autoscale Web or Worker roles, configure these settings in the Azure deployment profile before deploying:
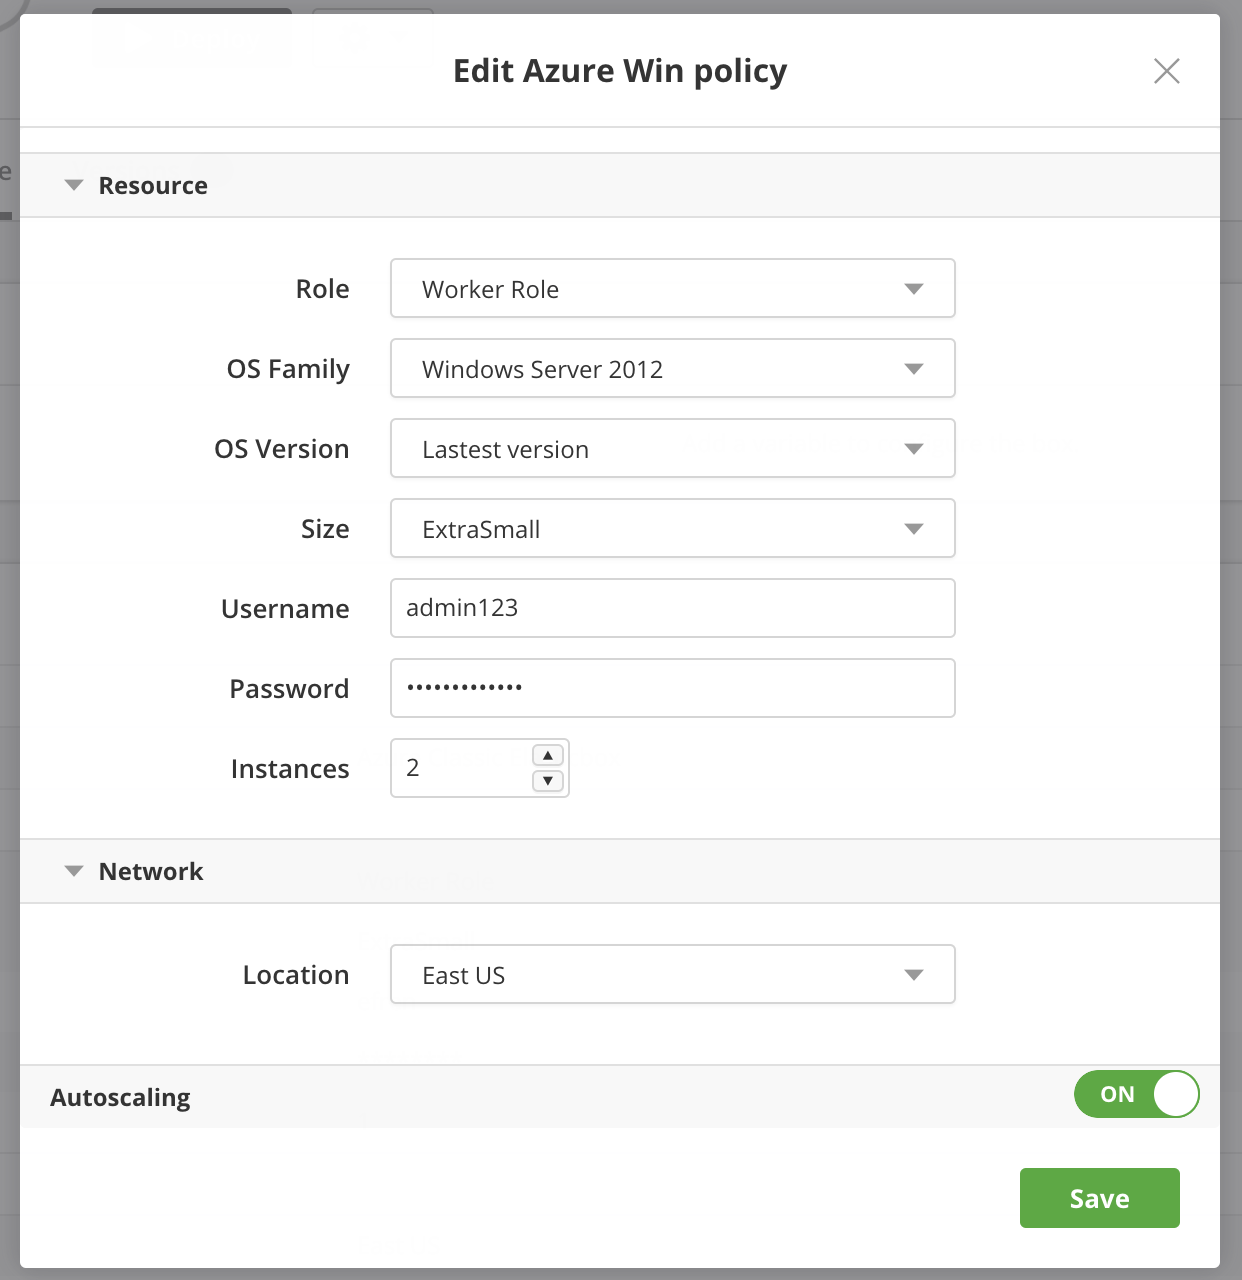
- Select a machine size for the role that has the sufficient number of cores to support scaling.
- Set the number of instances to at least two to meet high availability SLAs from Azure. Here, you can control autoscaling by setting the maximum number of instances to scale.
- Turn Autoscaling to ON.
For more information, see the Azure help.
Virtual Machine Role
The virtual machine role lets you build and manage highly customizable and flexible OS environments. For more information, see the Azure help.
To deploy in Cloud Application Manager, simply select your box based on Linux or Windows, and create a new instance. Then, choose from the following deployment options.
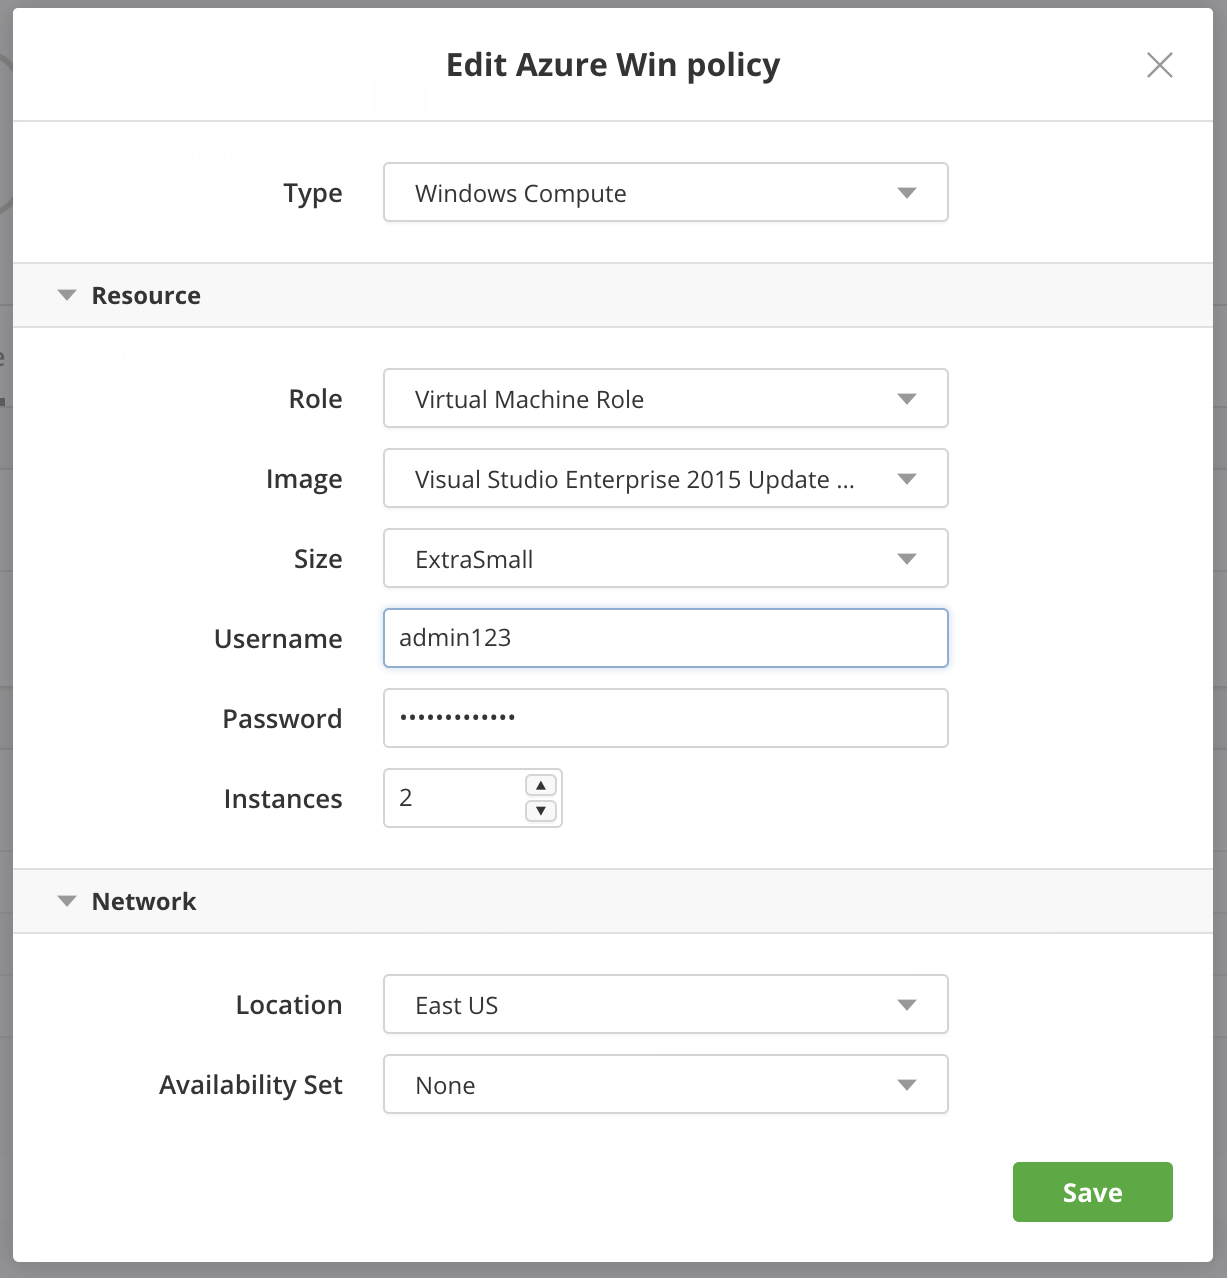
Azure Virtual Machine Role Deployment Options
VM Deployment
| Option | Windows or Linux | Description |
|---|---|---|
| Provider | Both | Select your Azure subscription or one that’s shared with you in Cloud Application Manager. |
VM Resource
| Option | Windows or Linux | Description | ||||||||
|---|---|---|---|---|---|---|---|---|---|---|
| Role | Windows | Select the **Virtual Machine Role **to deploy to a Windows environment that you want to customize and manage. To deploy to other roles, see Web and Worker Roles section in this documentation. | ||||||||
| Image | Both | Choose from images that are custom or stock OS images or are generalized, specialized VM images. The drop-down shows images relevant to a Windows or Linux deployment. Note that Windows 2008 images are not synced at this time because the Cloud Application Manager agent doesn’t work on them. | ||||||||
| Size | Both | Select a virtual machine size from the basic or standard tier options including D-Series. Each option such as A1 sets the number of CPU cores, OS disk memory, and number of input and output operations per second (IOPS) for the virtual machine. Size affects pricing. For more information, see Virtual Machine and Cloud Service Sizes. | ||||||||
| Username | Windows | Specify the root admin account username required to access and manage Windows machines. For Linux machines, the Service ID shown in the Cloud Application Manager instance page is the admin account username, for example, eb-gm3vg. Inbound traffic from the Internet or virtual networks to Windows virtual machines is allowed through Remote Desktop (RDP) with these default port settings.
|
||||||||
| Password | Windows | Required for root admin access to Windows virtual machines. The password must be at least 8 characters long containing 3 of the following: a lowercase, an uppercase, a number, or a special character. | ||||||||
| SSH Certificate | Linux | Required for Linux virtual machines. Create and upload a X.509 SSH certificate with the .cer extension accepted by Azure. SSH is required to allow inbound traffic from the Internet or from virtual networks to Linux virtual machines. These are default port settings for SSH access.
|
||||||||
| Instances | Both | Select the maximum number of virtual machines to deploy when you enable autoscaling and load balancing. |
VM Network
| Option | Windows or Linux | Description |
|---|---|---|
| Location | Both | Select a virtual network, region, or affinity group to physically place the instance. |
| Availability Set | Both | Select Automatic to let Azure create an availability set for fault tolerance. This protects the virtual machine against single points of failure in the same cloud service and region. For more information, see Manage the Availability of Virtual Machines. |
Autoscaling
To automatically scale Linux or Windows virtual machine instances in Azure, you require at least two virtual machines in an availability set in the same cloud service and region. We scale a machine up by one instance if CPU usage goes over 80% or scale down by an instance if CPU usage goes below 60%. In either case, we scale within the maximum instance limit you specified in the deployment profile. To autoscale, be sure to configure these settings:
- In the Instances drop-down, select at least two or more.
- In the Availability Set drop-down, select a set you previously configured in Azure or select Automatic to let us create one for you.
- Turn on Auto Scaling by setting it to ON.
Load Balancing
When you enable autoscaling, you also want to turn on load balancing to direct traffic evenly across instances. Configure these settings to enable load balancing:
- Enable autoscaling first.
- Since basic sizes don’t support load balancing, select a standard sized image.
- To turn it on, set Load Balancing to ON.
- To permit Internet traffic to spawned instances, specify port variables in the Linux or Windows based box. All ports you specify in the box appear in the Load Balancing section in the deployment profile. Be sure to add the ports in the profile. When you deploy, we open the ports as both public (input) and private (internal) endpoints on the instance.
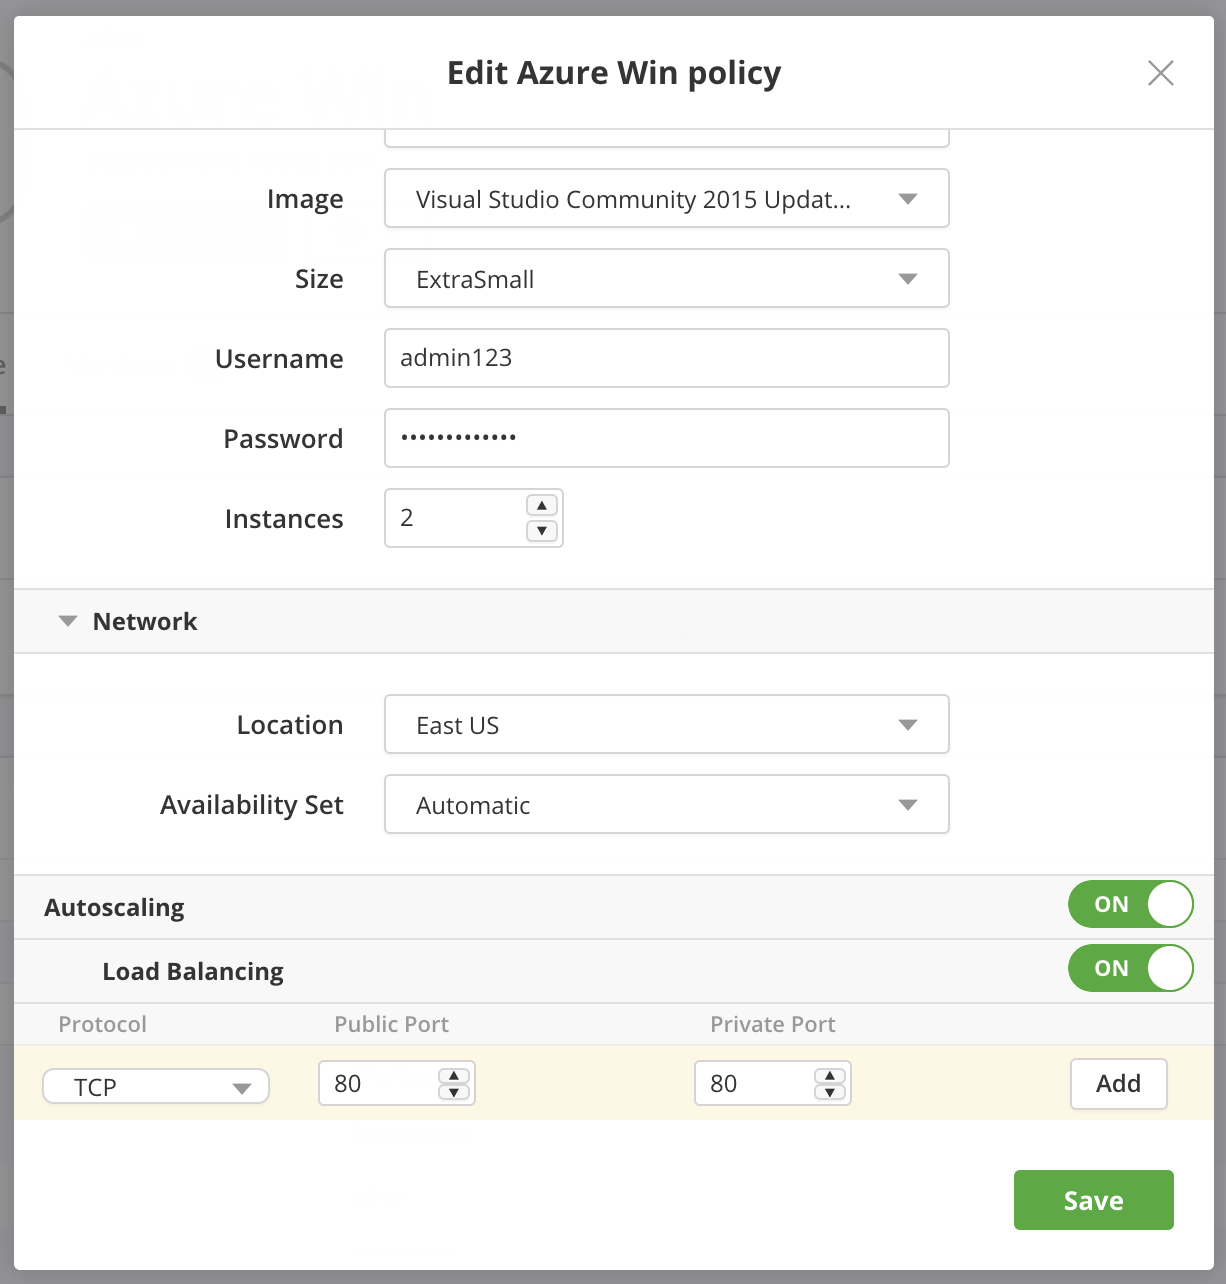
Example of Autoscaling and Load Balancing
Here we’ve set an instance to autoscale and load balance with a limit of up to three machines. To allow traffic to each instance spawned, the port variable on the box is mapped as both the public and private port through which Internet traffic reaches the instance.
Contacting Cloud Application Manager Support
We’re sorry you’re having an issue in Cloud Application Manager. Please review the troubleshooting tips, or contact Cloud Application Manager support with details and screenshots where possible.
For issues related to API calls, send the request body along with details related to the issue.
In the case of a box error, share the box in the workspace that your organization and Cloud Application Manager can access and attach the logs.
- Linux: SSH and locate the log at /var/log/elasticbox/elasticbox-agent.log
- Windows: RDP into the instance to locate the log at ProgramDataElasticBoxLogselasticbox-agent.log
